Wearing Your Kit Correctly
 When considering how to properly wear one's uniform and gear, there are three sources of documentation to rely upon: official regulations, photographic evidence and written evidence. Of these, the first two are the most useful and should always be considered together. As any student of military history knows, regs are regs and often soldiers don't follow them. There were always the formal occasions such as formations, inspections and parades when little to no deviation from the regulations was allowed. However, in the field soldiers often wore their kit according to individual preference or convenience. With that said, inspection of photographs shows that, by and large, the official methods were relatively adhered to.
The guidance below is not to intended to be an absolute rule or to claim that it is the
only way things were done. There will always be exceptions to the norm and examples can always be found of soldiers wearing their uniform and gear in a different way. However, we
can say definitively what a majority of soldiers did based on the sources mentioned above. This guidance is also intended to allow our membership to achieve a higher degree of uniformity in the ranks, which is something in reenacting to always be appreciated.
Uniform
Small Clothes
Equipment
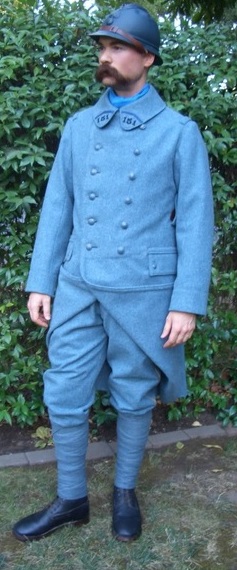 Greatcoat: This is a primary garment and part of the regular dress, which was worn in all seasons. With the exceptions mention below in the Jacket description, it was to be worn at all times. For marching order, and generally whenever on duty, the greatcoat was to be worn fully closed with the tails buttoned back. Of course, for cold weather the tails could be left down. For dress occasions, the greatcoat should be fully button (including pocket flaps), the tails buttoned back and the hook and eye at the collar fastened closed. When off duty, some men preferred to button back the top of the coat to form epaulettes. Cuffs were often unbuttoned and folded back, exposing the liner, when off duty or for informal tasks, such as when on a fatigue. Naturally, if the weather was particularly hot, the greatcoat could be removed -- either rolled on the pack
when marching or left with the rest of the gear when fatiguing.
Jacket: The jacket was reserved primarily for off duty wear or in cold weather, to be worn under the greatcoat. The rest of the time it was stored in the knapsack. There were exceptions to this. Men with specialized trades or tasks (i.e. machine-gunners, runners, stretch-bearers, etc.) were permitted to wear the jacket while on duty if they so chose. Naturally, if the weather was particularly hot the jacket would be worn instead of the greatcoat. Men on fatigue work might also be permitted this dress. Finally, for smaller raids, particularly in the second half of 1917 (during the period of "limited offensive" operations) the men might be permitted to leave the greatcoat behind. This was usually at the discretion of the commanders. Typically the jacket was worn fully buttoned.
Breeches: Should be worn with the waist at the level of the navel. Suspenders -- either regulation issue braces or private purchase y-straps -- were the norm. Some soldiers preferred wearing a belt instead of simple leather. When wrapping leg wraps, the lower leg above the cuff is creased in the center and folded to the inside and made to lay flat.
Kepi/Police Cap: The kepi was worn while on duty. The kepi is positioned level on the head. Though against regulations, some soldiers opted to curve the visor like a baseball cap visor or to crease it in the center, forming a reverse V. With the introduction of the Adrian helmet in autumn 1915, the kepi was reserved for off duty use. At the same time, the kepi was supplanted by the police bonnet and gradually phased out of use in 1916. The police bonnet was worn either level on the head or cocked to one side. When off duty, some men took to wearing the bonnet more casually by placing it sideways on the head. In cold weather, the sides could be taken down and worn over the ears as muffs.
Helmet: The Adrian helmet replaced the kepi for on duty wear in the autumn of 1915. The chinstrap was to be fitted on for formal occasions. Otherwise, it was normally worn up, fitted above the visor. Some soldiers opted to wear it fitted on during the action of combat.
Boots: Boots were issued out un-blackened in their natural color, but soldiers did have to blacken them upon receipt. The regulations stipulating that the boots must be maintained well-polished were relaxed due to the infeasibility of maintaining them in the trenches. Soldiers would however have to ensure they were blackened for formal occasions like dress parades, as well as for inspections conducted by officers who adhered strictly to regulations. Naturally, the wet and muddy conditions in the front lines implied that the color wouldn't last long and the conventional belief has developed that after 1916 many troops stopped blackening their boots all together except. This is not the case. Though the black naturally faded from wear, soldiers would still have polished them back up on a fairly regular basis. As for lacing style, this should be done in the straight (bar) fashion (sometimes referred to as ladder lacing). For instructions on how to do this, see this video or alternatively this page. Lace ends should be tucked into top of boots or leg wraps so that they are not visible. Hobnails are required. For more information on boots, see the Footwear page.
Leg Wraps: See the How to Correctly Put On Leg Wraps page.
Cravat: See the How to Correctly Tie the Cravat page.
Shirt: The shirt was worn with the bottom tucked into the underdrawers. When on duty, soldiers were allowed to be in only shirtsleeves when permitted by their commanders in specific instances, such as for work fatigues when the weather was warm. Otherwise, this was reserved for off duty or when going to the bath.
Underdrawers: The waist of the underdrawers was worn at a level equal to the navel, with the hems tied using the strings/ribbons attached, and the socks pulled over these.
Socks: Worn over the bottom hems of the underdrawers. Alternately, some soldiers (presumably for more rural backgrounds) preferred to wear foot wraps instead.
Flannel belt: Fitted around the waist over the shirt and drawers. It was necessary to fold the belt in two lengthwise.
Order in which equipment is put on:
- Put on leather accoutrements (belt, suspension braces, cartridge pouches), leaving the belt unbuckled.
- Undo cloth belt loop of greatcoat and feed the end up through the hole of the bayonet carrier, then button down.
- Sling the two haversacks, one over each shoulder, and then sling the canteen over left shoulder (hanging on right-side of the man) with the belt feeding over the front strap only of each haversack and the canteen strap (to keep them from sliding forward).
- Buckle belt.
- Put on knapsack by fixing the left shoulder strap at the desired length, leaving the right strap undone. Lift the pack and slide left arm through the left shoulder strap, then grasp the end of the right shoulder strap and pull upward to drag the right side of the pack up to the right shoulder. Holding the strap tightly to maintain the pack at the shoulder, bend forward at the waist and pull the shoulder strap down under the army and behind to the back,, bringing the end of the strap to the right buckle to fix it in place.
- Put on gas mask (either over the left shoulder or suspended from the right cartridge pouch).
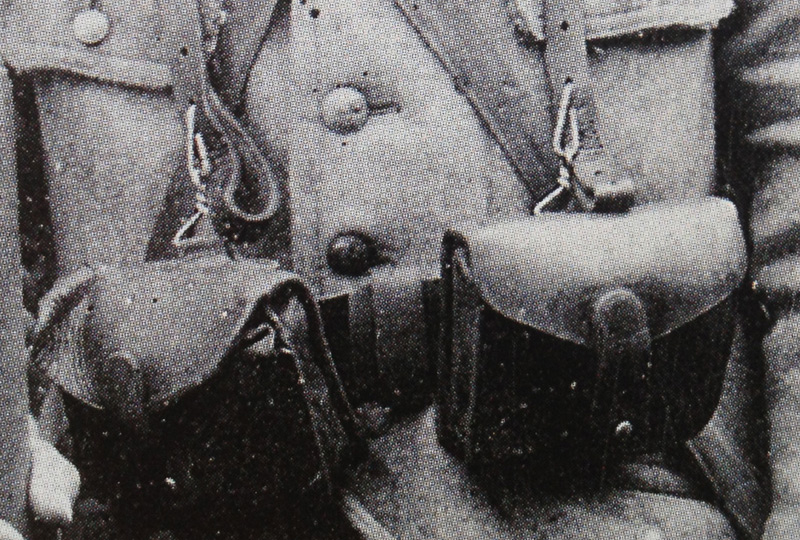
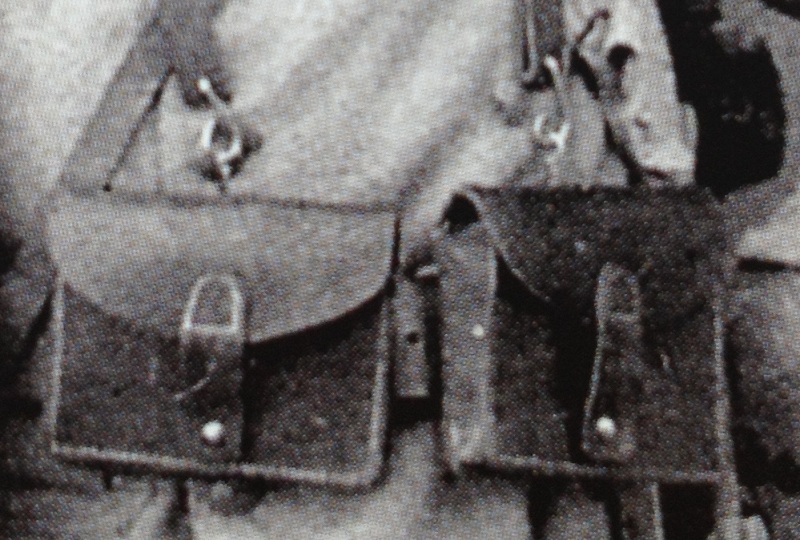 Leather accoutrements: Consisting of the belt, three cartridge pouches, suspension braces and bayonet-carrier. To assemble, pass the hole-punched end of the belt through the belt loops of the first cartridge pouch and slide it all the way over toward the belt buckle. Attach the second cartridge pouch and slide it to the center of the belt. Next attach the bayonet-carrier and finally the third cartridge pouch. The tail end of the belt should be on the left. Finally, attach the suspension braces by hooking the s-hooks to the cartridge pouches. Note that that the button end (top) of the hook should face in with the hook itself facing out. The length of the braces should be adjusted so that when the assembly is put on, the belt is level with the navel. Any excess length should be folded back on itself toward the body (i.e. rough sides together) with the s-hook
passing through the holes on either side to hold the excess up in place.
Leather accoutrements: Consisting of the belt, three cartridge pouches, suspension braces and bayonet-carrier. To assemble, pass the hole-punched end of the belt through the belt loops of the first cartridge pouch and slide it all the way over toward the belt buckle. Attach the second cartridge pouch and slide it to the center of the belt. Next attach the bayonet-carrier and finally the third cartridge pouch. The tail end of the belt should be on the left. Finally, attach the suspension braces by hooking the s-hooks to the cartridge pouches. Note that that the button end (top) of the hook should face in with the hook itself facing out. The length of the braces should be adjusted so that when the assembly is put on, the belt is level with the navel. Any excess length should be folded back on itself toward the body (i.e. rough sides together) with the s-hook
passing through the holes on either side to hold the excess up in place.
.jpeg?dl=0) A side note here: WWI-era braces had only 9 holes punched along the lengths, while post-war sets were longer in length and had 11 holes. If using a post-war set of braces, it may be necessary to cut off the the excess length of the last two holes in order to achieve the correct fit and look. The front cartridge pouches should be positioned roughly 5-6" apart. (The Colonial style was to push the two front pouches together, centered on the belt buckle.) The bayonet-carrier should be positioned on the left hip with the cloth belt loop of the greatcoat fed up through the hole of the carrier and buttoned down. This also acts as a guide to the proper level of where the belt should be worn. If carrying a M1886 bayonet with the quillon (“catcher”), the quillon should be facing forward.
Haversacks: Initially in 1914, only one haversack was to be worn on the man, the other being carried on the pack. This was to be worn in bandolier fashion over the right shoulder (hanging on the left side of the man). Officially, the belt was to be worn over the front band only of the haversack strap to keep the haversack from sliding forward. The top edge of haversack should be maintained about two finger-widths below the hilt of the bayonet. By 1915, both haversacks were typically worn on the man, one over each shoulder with the front straps forming an X on the man's chest.
A side note here: WWI-era braces had only 9 holes punched along the lengths, while post-war sets were longer in length and had 11 holes. If using a post-war set of braces, it may be necessary to cut off the the excess length of the last two holes in order to achieve the correct fit and look. The front cartridge pouches should be positioned roughly 5-6" apart. (The Colonial style was to push the two front pouches together, centered on the belt buckle.) The bayonet-carrier should be positioned on the left hip with the cloth belt loop of the greatcoat fed up through the hole of the carrier and buttoned down. This also acts as a guide to the proper level of where the belt should be worn. If carrying a M1886 bayonet with the quillon (“catcher”), the quillon should be facing forward.
Haversacks: Initially in 1914, only one haversack was to be worn on the man, the other being carried on the pack. This was to be worn in bandolier fashion over the right shoulder (hanging on the left side of the man). Officially, the belt was to be worn over the front band only of the haversack strap to keep the haversack from sliding forward. The top edge of haversack should be maintained about two finger-widths below the hilt of the bayonet. By 1915, both haversacks were typically worn on the man, one over each shoulder with the front straps forming an X on the man's chest.
It is worth noting here that reenactors should avoid wearing the haversacks too high, which is perhaps a habit carried over from Civil War reenacting. As a general rule, the top edge of the haversacks should be kept roughly equal to or just below the belt, with some deviation (either above or below) being acceptable.
Canteen: The canteen was to be worn in bandolier fashion over the left shoulder (hanging on the right-side of the man), so as to avoid striking the bayonet. Officially, the belt was to be worn over the front strap of the canteen only to keep it from sliding forward. The cork of the canteen should be level with the bottom edge of the belt, with the small spout forward. The small spout was intended to be drunk from so as to conserve water. Some soldiers preferred to suspend their cups from their canteen by crossing the cork and stopper twines through the cup's handle or by clipping the cup handle to the sling.
It is worth noting again here that reenactors should avoid wearing the canteen too high, which is perhaps a habit carried over from Civil War reenacting. As a general rule, the canteen cork should be kept equal to or below the top edge of the belt.
Gasmask (M2): for transport, the M2 mask was held in the carrying tin, with the accompanying canvas haversack placed at the bottom. Per regulations, the tin itself was to be slung onto one of the cartridge pouches by the lace/twine. It was also common to see the can slung onto the belt. Alternately, a soldier might replace the short-length lace/twine for a longer one so that the tin could be worn bandolier fashion over one shoulder.
When at the alert, the mask was to be removed from the tin and placed inside the canvas haversack. Regulations stated that this was to be worn around the neck with the mask resting squarely on the chest, though some soldiers opted to wear the haversack bandolier fashion over one shoulder.
Knapsack: See the Knapsack Arrangement page.
Assault Roll: See the Assault Order (Assembly of Assault Roll) page.


